Elden Ring Nightreign‘s procedurally-generated locations make each run different from the last, but one certainty on every map is the Castle. Standing in the center of the map, the castle holds multiple great enemies, two bosses, and a wide assortment of chests to loot.
While exploring the castle is incredibly dangerous, with the enemies inside scaled to be a reasonable challenge for characters of levels 10-15, it’s also one of Elden Ring Nightreign‘s best sources of powerful weapons and equipment. It’s also one of the few locations to offer a guaranteed talisman, offering a choice of three to anyone who makes it inside the lowest floor of the central keep.

Related
Complete Elden Ring Nightreign Achievement Guide
Follow this guide to all Nightreign achievements to learn how to get every achievement and earn the Nightreign Platinum Trophy.
General Strategy for Looting the Castle in Elden Ring Nightreign
When taking on the Castle, it’s important to remember that it’s filled with high-level enemies and bosses. This means it’s best tackled on Day 2, with a level of at least 8-10. However, a well-organized and well-prepared group could potentially clear it out on Day 1 if they’re willing to accept the higher time investment involved. If you’re aiming to clean out all the major sources of loot, you’ll want to start by entering the moat/drainage channel of the castle and infiltrating via the castle sewer. This will lead you to a boss room containing one of seven possible bosses, and defeating this boss will open a path up into the central keep.
The interior of the central keep has two gates that can be opened by stepping on pressure plates in front of them. One of the chests will always contain a Dormant Power, which will allow each player to choose a Talisman from three options, making it incredibly valuable if you haven’t found any useful Talismans around the map. Once you’ve got your loot, head for the Gate leading out to the broken bridge, overlooking the drainage channel you used to enter.
If the enemies outside are Crucible Knights or Banished Knights (with an Elder Lion), then you should clear them out for Runes and a chance at getting a Dormant Power drop. If the great enemies in this Castle are trolls, then this area will only contain Jar enemies and is probably best left unlooted, since the trolls will throw magic pots down on you and deal a ton of damage.

Looking out from the gate you used to exit the central keep, turn left and climb up to find an area with a bridge up above you. You can use the spot shown in the first image above to climb up onto it, reaching the next section of the castle and some more enemies. Take out the great enemy/enemies here (a Troll, Crucible Knight, or Banished Knight) and head into the next section of the keep.
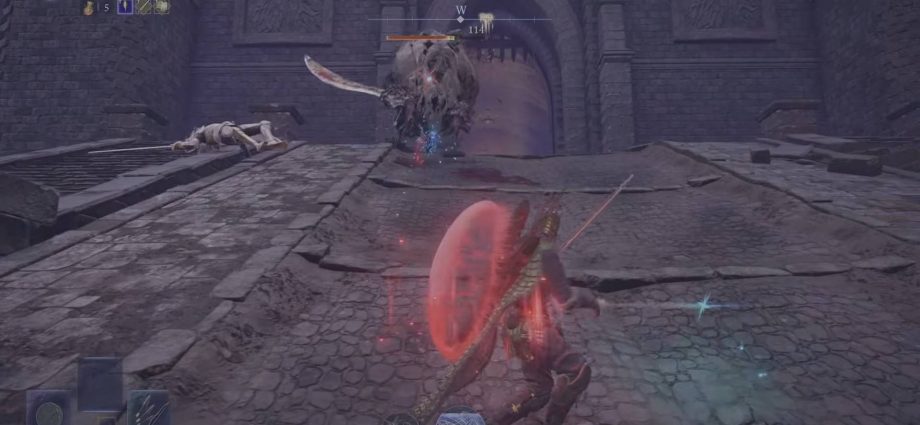
From here, you can either turn right and head up some stairs, eventually leading you to the roof and the boss on the roof, or go straight ahead to reach another open area with more great enemies. If you choose the latter, you can turn right after going through the door to find a spot you can climb, leading to a merchant and more climbable platforms.
You can take a shortcut to the top of the castle from here by climbing up and running along the ledge, as shown in the images above, allowing you to quickly and easily access one of the upper hallways that lead up toward the roof. Follow the hall as it wraps around, and you’ll eventually reach a collapsed section you can climb to reach the roof, where you’ll find the castle’s second boss. There are a few different boss types that can spawn up here, and taking them out will always result in a lot of runes and some very good loot.
All Castle Enemy Types in Elden Ring Nightreign

When you approach a Castle, the first thing you should figure out is the great enemy type you’re facing. The three varieties you can encounter are Crucible Knights, Banished Knights, or Trolls. Crucible Knights come in two varieties, with one wielding a sword and greatshield and the other wielding a greatspear. Once you’ve learned their combos, they’re quite easy to fight one-on-one, and even easier with two allies to split the aggro.
The Banished Knights are similarly easy to read, but tend to be grouped up so you’ll end up fighting more than one whenever you attack them. They either wield a sword and shield, two swords, or a halberd, and they’ll gather wind around themselves before launching into their most dangerous combos.
This wind deflects projectiles and will damage you if you’re next to them, so it’s important to back away and go on the defensive when they wind up their big attacks. They’ll also bring along an Elder Lion to guard the front gate of the castle, which can do a lot of damage but has predictable slashing and jumping attacks with plenty of openings.

The Trolls are easily the most frustrating of the great enemies that can spawn at the castle. They can spot you from a distance and will hurl magic pots, dealing a ton of damage and leaving a damaging blue fire on the ground where the pot hits. The best way to fight them is up close, where they’ll resort to the same moveset as any other troll and are considerably easier to fight, though this can be complicated if other trolls spot you and are in range to throw pots at you.
Since all the Troll attacks, including the thrown pots, will deal damage to any non-Troll they hit, you can bait them into taking out the weaker soldiers guarding the castle with them. You can also have the Guardian use their Whirlwind to deflect the pots, if their timing is good. Jar enemies will spawn near the castle gate when Trolls are guarding it.
Any Great Enemy you defeat has a chance of dropping a Dormant Power when defeated, allowing you to gain some excellent loot if you’re willing to take a little time to clear them out. This is easiest when dealing with Crucible Knights and Banished Knights, as the Troll ranged attacks make them a little time-consuming to deal with.
All Castle Basement Bosses in Elden Ring Nightreign

The Castle Basement can feature one of seven possible bosses, which are randomly determined independently of the roof boss and the enemies guarding the castle. The possible bosses are as follows:
|
Boss |
Overview |
|
Red Wolf of the King Consort |
This is probably one of the easier bosses to deal with, though it moves quickly and has some dangerous ranged attacks. roll through its biting lunges and attack quickly for the best results. Red Wolf doesn’t have much health and can be staggered quite easily with jumping heavy attacks or the Executor’s parry. |
|
Leonine Misbegotten |
Speed is this boss’ only advantage against you, since it leaves plenty of openings after the sword swinging combos and especially if you manage to dodge their jump attack. They’re also vulnerable to back stabs, so this is another great boss to run into in the basement. |
|
Grafted Scion |
Another pretty straightforward boss, the Grafted Scion has more health than the Red Wolf but is just as susceptible to staggering. Dodge through its sweeping combos and punish as it recovers. When it performs jumping stab attacks, dodge forward and to the side to avoid the stabs, then counterattack after it lands for the third time. |
|
Ancient Hero of Zamor |
The Ancient Hero of Zamor is another boss you’ll always be happy to see when entering the castle basement. With sweeping sword attacks that are fairly easy to read, the only real danger is getting frostbite from their ranged attack or their ice storm attack. Make sure to back far away when they plunge their sword into the ground to dodge the ice storm, and they’ll go down pretty quickly. Fire damage also helps. |
|
Black Knife Assassin |
The Black Knife Assassin is fast, with diving slashes, a jumping stab, and a quick grab that can deal a ton of damage. Their ranged attack will deal additional damage over time and temporarily reduce max health, so watch for the red glow when they charge it and make sure it doesn’t connect. |
|
Royal Revenant |
An irritating boss returning from Elden Ring, the Royal Revenant fights aggressively with lunging attacks and poisonous spit. It can also sink into the floor to teleport and break your lock-on, so its important to keep your eyes peeled for its reappearance. Unfortunately, unlike in Elden Ring, healing spells won’t damage the Royal Revenant here, so you’ll have to rely on the precious few openings between its attacks and hope for a stagger. |
|
Bell-Bearing Hunter |
Easily the worst boss you could find in the basement, the Bell-Bearing Hunter uses long-range telekinetic sword swings to hound you and ensure there’s no such thing as a safe distance. With good timing you can roll through (or Executor Parry) its swings, but be wary of the charging slam they use to close the distance. They can also use a grab attack that requires incredible timing to dodge through, making them all the trickier to face. |
All Castle Roof Bosses in Elden Ring Nightreign

The Castle Roof Boss is usually, but not always, one of the toughest bosses on the entire map. They also offer a ton of runes and usually drop incredibly powerful weapons when beaten, so it’s essential to go in prepared. Here are all the possible Castle Roof Bosses:
|
Boss |
Overview |
|
Ancestor Spirit |
The Regal Ancestor Spirit is one of the best bosses you could find on the roof. While its damaging pools and tendency to jump around make hitting it a bit of a pain, it’s ultimately fairly easy to deal with, especially if you have ways to damage it from a distance. |
|
Erdtree Avatar |
Another excellent find, the Erdtree Avatar hits hard but has a slow and predictable moveset. Just remember to back off and sprint in a circle around the boss when it creates light projectiles, and hit it between its other attacks. It’s particularly vulnerable to fire, so sources of fire damage are ideal. |
|
Magma Wyrm |
The Magma Wyrm is a hard-hitting but easy-to-read boss, much like the Erdtree Avatar. Make sure not to get hit when it charges around, and roll through its spinning slashes and overhead slam, and it shouldn’t be too tricky. Status effects like Bleed and Frostbite work well to chunk its health. |
|
Death Rite Bird |
The Death Rite Bird, like the Magma Wyrm, hits hard. It’s also fast, and can create lingering ghostflame that deals damage and frostbite buildup to anyone standing in it. Luckily, it’s also cripplingly weak to holy damage, especially if you can hit it in the head. Just remember to back away when it charges up and plunges its poker into the ground, since it’ll cause an explosion of ghostflame and leave a lingering field. When it jumps away and rears up, prepare to dodge a vicious grab attack. |
|
Draconic Tree Sentinel |
A pretty dangerous foe, the Draconic Tree Sentinel uses its Dragon Greatclaw to deliver brutal slam attacks charged with lightning. If you try to get some distance, its horse will spit fireballs at you, so be ready to dodge. The Draconic Tree Sentinel can also create red marks all over the ground, which will be struck by lightning shortly afterward, or call down focused bolts on their current target, so precise dodge timing is essential if you want to take it out. |
|
Black Blade Kindred |
The Black Blade Kindred is a Valiant Gargoyle, but powered up with Destined Death. This manifests in several attacks clad in black and red flames, which will deal additional damage over time and reduce your maximum health temporarily when they hit. Beyond that, they use the Valiant Gargoyle moveset, with all of its fast and hard-hitting attacks using an axe and a twinblade. |
|
Bell Bearing Hunter |
I have already mentioned how awful it is to see this guy in the basement, and he’s just as bad when he turns up on the roof. All the advice given in the basement boss section applies here too. |